

Sunday, December 19, 2010
Mermaids
Friday, November 12, 2010
Getting Ready for December Show/Sale
Just a quick peek at the things I have been making lately to get ready for the Coastal Carolina December Show/Sale


 Plus, just shipped this bowl commissioned by a lovely customer in Jacksonville, Fl---


Friday, October 15, 2010
This time I got a picture

Sunday, October 10, 2010

Friday, September 24, 2010
Taken on her Debut
Lorelei won a Best in Category award by Juror of the Landfall Art Show. She also was sold and "renamed." Her new owner is a lovely woman who is presently undergoing cancer treatment. When she saw her, she couldn't sleep that night thinking about her. Lorelei's new name is "Hope." She has found a wonderful home.
Two more pieces that just got out of the kiln for the second day of the show. One of my favorites sold and I never got a photo of her after glazing. She sold two hours after I set her up. Here are some photos of her while drying. She really looked great after glazing.

Two more pieces that just got out of the kiln for the second day of the show. One of my favorites sold and I never got a photo of her after glazing. She sold two hours after I set her up. Here are some photos of her while drying. She really looked great after glazing.

Sunday, September 05, 2010
Lorelei, my first full size figure all in ceramic clay
 Finally, she is finished and quite sturdy with five separate pieces. She will make her debut at the Landfall Art Show next weekend and if she doesn't find a home there, I will put her in the Arboretum Show in October. Hopefully by Christmas she will be in a good home. I enjoyed the challenge of making her, but not sure I will be attempting anything quite this adventurous any time soon. More photos of her and a video can be seen here.
Sunday, August 15, 2010
Honored and Humbled

I am honored to have one of my pieces on display as a part of our local guild's exhibition at the NC Pottery Center. I learned upon our group's arrival for the opening reception on Friday that my box had been sold before the show's official opening and the buyer has to leave the item on display until the exhibit closes in November. I was surprised, pleased and humble to have this happen in the heart of NC's pottery center. Please visit the exhibit there if you can, the NC Pottery Center is awesome! I have uploaded all the photos taken during our visit to Seagrove (bus trip with several other members of our guild), to Seagrove, (In addition to the visit for NC Pottery Center reception, we also visited several potters in the area, and one fantastic "collector"). It was a great trip and the photos can be seen here.
Friday, August 06, 2010


Thursday, August 05, 2010
Tree Treasury

My Joyce Kilmer Tree Vase was just featured in this Etsy Treasury tucked among some beautiful tree related art. I am so pleased.
Saturday, July 24, 2010
Using Photoshop to Assemble "Lorelei"

Yes, that's her name, and the last piece was finished (building) only, just two days ago. The top two sections have been bisque fired, the bottom three are in various drying stages, hopefully ready for bisque firing next week or so, in this weather, drying is pretty fast. Since I can't assemble her I have had to enlist aid at the studio to hold the various sections in place so I could get some sort of visual bechmark, there is still a lot I don't know yet, until I can really stack the pieces one on top of the other. But by the time I can do that, I won't be able to change much. Well using Photoshop, I have stacked her just to see how she "might" look. Not too bad for my first major sculpture attempt. I think she will end up being about 60--62" tall with several inches of each piece lost as they fit inside another piece. Since I can't actually place the items onto the lower pieces since they are too soft, I had to do it with Photoshop and the photos I have taken along the way. Now to get each piece through the bisque and glaze firing process, hope to have her done for the September Art Show. It has been grueling working on her in the studio ----hot and sweaty work. About 80 lb of clay all together. I think this project has gotten me over the desire to make "big" things, at least for now.
Monday, July 19, 2010
Avatar maybe
In between struggling with my full size figure--garden girl, I whipped out this vase again using a face, but a studio friend at first look thought I was trying to make her look like the Avatar image, but actually I havn't even seen the movie, nor thought along those lines, however, if that is what she looked like to him, maybe he has something, so if you think so to, Avatar she is. But I love the way she turned out. Also made some ceramic hooks to test some glazes on my paper clay to help decide how to glaze my full size figure. Also found my silkscreen worked fairly nicely over two of my matte glazes, silkscreened underglaze on top of applied but dry, but not yet fired, glazes. I had done some previous experiments with this also and it works well.
Thursday, July 01, 2010
Record three posts in one day

Another grouping showing progress made on my garden girl today. Another studio friend, Karen Harbaugh was nice enough to hold the top section just about where it would rest (clay on bottom is still too soft to support the weight of the head and shoulders without someone holding it. But I have the arms in place and a nest for her to hold, now she is back under wraps to dry and next week I will tackle the two pieces of the skirt and start thinking about other decorations. I may silkscreen quotations/poems about the garden on her not sure at the moment. But, I am very pleased so far. Also, my jumping frogs sold to the first person who saw it. I will do one with butterflies too, that should be fun. Well, now to get ready for my weekend company, daughter and family will be coming and our grandaughter will be Miss Liberty in our local parade. Promises to be great fun.
Frogs are Jumping

In the meantime, I have been creating a few other whimsical things so I can take a break from the full body figure. I had fun making this and just finished it, makes me smile and hope it makes you smile too:
The Butterflies have landed
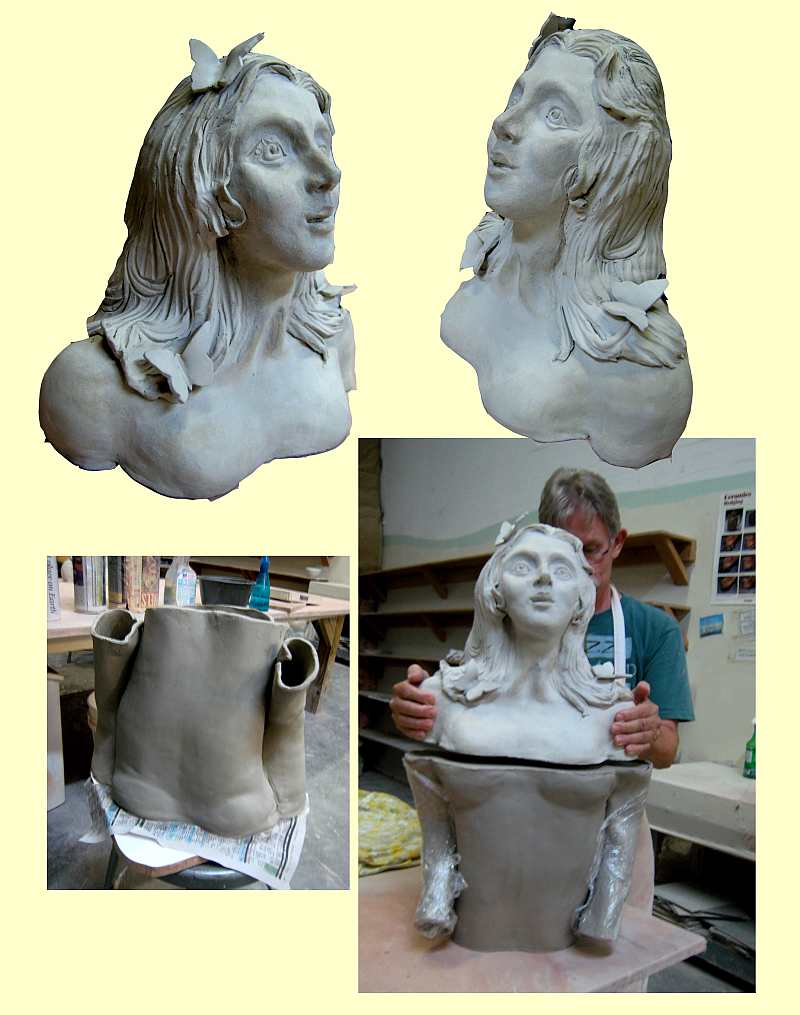
Phase II of my latest project (just to see if I can?) is to make a lifesize or almost lifesize figure, building it in phases and in sections due to kiln size limitations, hopefully,ultimately fitting together with a rebar in concrete support structure. The first phase, shown previously was the head, originally, I had planned to make a sea oriented figure, but have recently tired of the beach theme so when I wasn't looking, butterflies landed on her head, and changed my focus. I knew the first two phases, head and torso/hands would be the most difficult, and since I have never done this before, nor had a class on figure modeling, I was sort of just winging it. I started the bodice section on Monday and I did have a template for the place where the head section would fit on top, but because of the soft clay, I decided to build the bodice upside down, knowing I was taking a risk about proportions, etc. When that section hardened enough to turn right side up, I enlisted the help of one of my studio buddies, Roger Mansur, to hold the head section up over the bodice to see if it was close enough. For the past two days, I have been working on the arms (arghhh!), now knowing why so many figures are made without them. At any rate, I have now created a nest bowl for her to hold which helps disguise the hands a little. It is coming along and today I will take photos of that section too. She obviously is a garden girl now and the next two phases will be the skirt sections, each designed to fit with the other pieces. Whew, can't believe I have gotten this far. I did design the project so I could quit at each stage (first two), in case things didn't work out, but now I think I might have a shot at finishing her. When she was going to be sea oriented, I was calling her Lorelei, but now I am not sure she might need a new name. Still am contemplating decorating her with garden quotes, etc., and might even make a base to be able to put garden creatures, squirrels, bunnies, etc around her skirt. Well, here she is so far.
Tuesday, June 22, 2010

My first (almost lifesize) sculpture

Well, to give myself more challenges and get away, at least temporarily, from some of the smaller things I make, I decided to try an almost "lifesize" figure. I plan to construct it in four pieces so I can get them all in the kiln which has size limits, of course. I also realize I can give myself room to "quit" at each of the first two stages, if I so choose by making it this way. The first top part has been constructed and is now drying. I am using paper clay from Axner which I love for many reasons, especially for a project like this. I now can contemplate and plan the remaining pieces, which might have a sea theme, I especially like the poem "Oceanus" by William Sharp 1855-1905---and may make silkscreens to decorate her dress along with other ocean imagery/text. Still in planning stage although I feel I reached a milestone getting her this far. She is tucked away behind toweling to dry. I am also inclined to make all four pieces and not fire them until all have been constructed/decorated with underglazes, etc. A true work in progress, here she is:
Saturday, June 12, 2010
Inspiration from Scandinavia
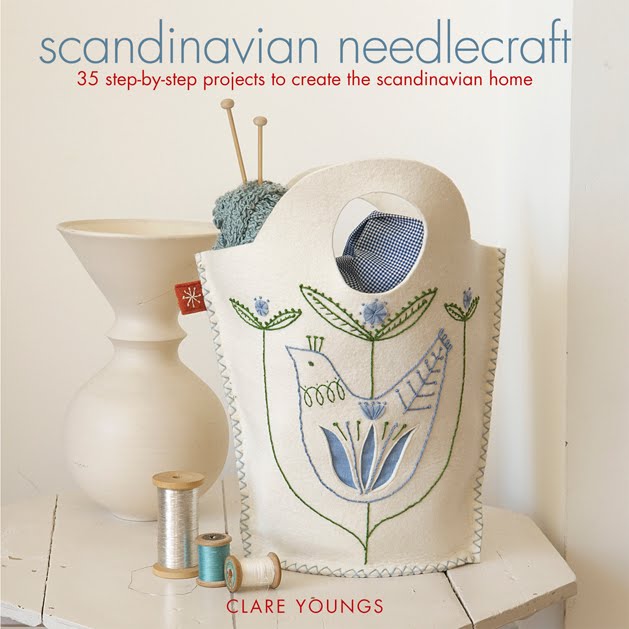
I often get inspired by designs I see in other medium. For example, this gorgeous Scandinavian bag made from felt was the inspiration for the series I am making in ceramic, as vases/holders, etc. Just delivered this one
 to the Topsail Art Gallery for sale, and have glazed four more different designs yesterday which might be out of the kiln next week. I am not the only one inspired by the Scandinavian bag, it appears Canuck Craft was also inspired.
Thursday, June 03, 2010


Wednesday, June 02, 2010
My herons are in glorious company

Thanks to Sarah Knight for including my herons in the moonlight in her gorgeous collection/treasury at ETSY
Friday, April 30, 2010
My new Beach Box

Similar to design of my beach mug, this nice tall box is about 11" tall. I will be listing it on my ETSY store soon--I was really happy with the way this turned out. I just listed my Herons in Moonlight vase

Wednesday, April 28, 2010
I can reveal contents of package now!

This is the commissioned piece using my computer/Photoshop skills to capture suitable images and text requested to enable me to create custom silkscreens to use on this box.
Here is the photo of the conductor that I used to create the silkscreen.

and using photoshop, I came up with this picture to be used as silkscreen for the box:

Saturday, April 24, 2010
Can't open package just yet

This week I delivered a custom ceramic piece commissioned by a group of local musicians to give to their departing conductor. Can't unwrap the package and show the contents until after the presentation on the 27th. This was a fun project and I had to make several silkscreens specifically designed for the gift recipient. Next week I will post the open package.
Saturday, April 17, 2010

Sunday, April 11, 2010
Thursday, April 01, 2010

Wednesday, March 24, 2010
Some Finished items

Most of the boxes shown in slideshow below while drying are now finished. Now I move on, time to tackle some other things. I did love the way these silkscreened items turned out and boxes are useful. I have two more platters to go into glaze kiln today and one serving plate with feathers and a quotation from Emily Dickenson. I just found my favorite (of the day) quotation which I found on Vicki Liles Gill's blog which is from famous potter Bernard Leach. This quotation sums up art perfectly for me:
"I think the final word I would use as a criterion of value in the world of art, if I were reduced to a single word, would be the presence of life.... It is a force that goes beyond all arts or artists. It is the ultimate standard and it is attainable."
Sunday, February 28, 2010
Waiting to be bisqued
I love my new boxes with different silkscreen designs on each on and lots of texture on another. I love making these:
Saturday, February 13, 2010
More from February's efforts

I had fun with these, trying to get more text on my work, the tree vase was fun and I tried two different versions of the birch tree silkscreen, one all white, the other white and black. I had used this silkscreen way back and made three items, all sold. They are in the slideshow in this posting, black birch on turquoise background, in three seasons, fall summer and winter.
And needed to make more "catitude" vases since all that I have made have also sold. I am working on a platter with the tree and poem as well and will do a few more items/forms using that theme, but I have so many more ideas I want to try, I am energized again. In Wilmington, we rarely get snow, but we woke up this morning to this beautiful sight

More pictures can be seen here.
Thursday, February 04, 2010
A few more from January

.....and a few more things finished. Did three window scenes but only one with lid. Also did a total blue screen printed fabric print on cylinder vase and decided to give it a ruffle front, I need to do some more blue and white, they seem to sell quickly.
Then, a few playthings for Valentine's day. I have a few pieces drying now that will use my birch tree screen on speckled brown clay, they look pretty good in the drying stage. Will photograph later.
From drying to finished piece

Looks like the photoshop test glaze was pretty useful. First picture was as piece was awaiting bisque firing, scene painted with window and cat silkscreened over scene, then the Photoshop "test" glaze then final picture with background glaze, black and clear glaze over scene which brightens the colors of the underglazes. I will have to explore using photoshop again to test glazes on a piece.
Friday, January 22, 2010
Using Photoshop to "test" Glazes

I was wondering what glaze I would use for my windows series. I used photoshop to test the look of a glaze I was considering, didn't go for perfect photo, just enough --like a sketch to see if I would like it and I do. Just found an item where I had used the intended glaze and cloned bits of that glaze from the pear box where I used it before and cloned it around the window on the piece drying. Not a wonderful photo, but just enough to see that it would work for me and I will try this glaze when item is bisqued. The hardest part of glazing is deciding what glazes to use. If I can think about it now, glazing will be easier.
One more "Window" Box drying

A third vessal, this time a lidded tall box with window and beach scene and grey cat this time. Next to that is a tall cylinder vase with an allover blue and white fabric design with ruffled front, also drying.
Wednesday, January 20, 2010
Using the Sun's UV rays to burn silkscreen

In case you wondered what that looked like: Photo from a previous class, I am sorry I didn't make a video with sound of Terre singing her homage to the sun (she was a schoolteacher in a previous life), while we were burning our screens. It must have worked though, because the screens all turned out perfectly with even a 3 UV rating last Saturday.
Let there be light!

Thanks to Ginny Eckley's instructions on how to build a light table, I am now able to make silkscreens no matter how bright it is outside. Up to now, I have waited until mid-day to "burn" a new screen, and thanks to living in mostly sunny NC, this hasn't been too bad, but now when the creative urge strikes in the dark, I can whip out the light table my DH made me for Christmas and drive on! Exposure time is 12 minutes (in mid-day UV sun, 1 minute +/- 10 seconds), but I am a multi-tasker and can find plenty to do while timing the 12 minutes.
Tuesday, January 19, 2010
New pieces drying
My students in my silkscreen class last Saturday got so excited I was inspired to make a few more --I have been wanting to do a windows series for a while, so these are my first test pieces along with another beach box with shells only. All greenware at this stage. 


Sunday, January 17, 2010


Subscribe to:
Posts (Atom)