Friday, July 25, 2014

More cards and envelopes made with painted deli wrap paper


Two more cards (but lots more deli paper painted), I am amazed at how much thought to details goes into card making.  The envelopes are just plain fun and easy to make, but selection of glue, one for the flaps to make the envelope, but another for the top to "lick and seal"  then how about address labels?  These I cut out of full page sticky back labels.  I had used these in previous posts as I painted both sides and/or used gelli plate, but now I am using them to provide address labels to those who will buy my cards and need them.  I have been experimenting with all the various options.  I tried using watered down Aleene's repositionable glue for the top, but then I needed to cut strips off of document holders (polypropylene) which will cover the sticky bit until ready to seal/mail.  But now I found a recipe for DIY lick and stick glue here, which I will make and try when I get some gelatin.  So I have

1. Painted the papers (really fun part), now being sure I paint as much to the edges of the deli wrap paper as possible so I can have some coordinating bits to use on the cards.  Sometimes several sessions of painting were required, using various techniques to include scraping paint, gelli printing, stamping, stenciling, silkscreeningtexturizing by scraping over embossing folders or texture plates, drywall tape, etc.

2.  Using the Envelope board, make the envelopes

3.  Using my Printer and Cameo Digital Cutting/ "print cut" functions (see posting below for picture of layout), printed cardstock with sentiments in either cloud shapes or later I used banner shapes and with my "handmade by" on the back of the cards. 

 After printing each sheet, must run through the digital cutter to cut out the card and sentiment shapes

4.  Glue envelope flaps.

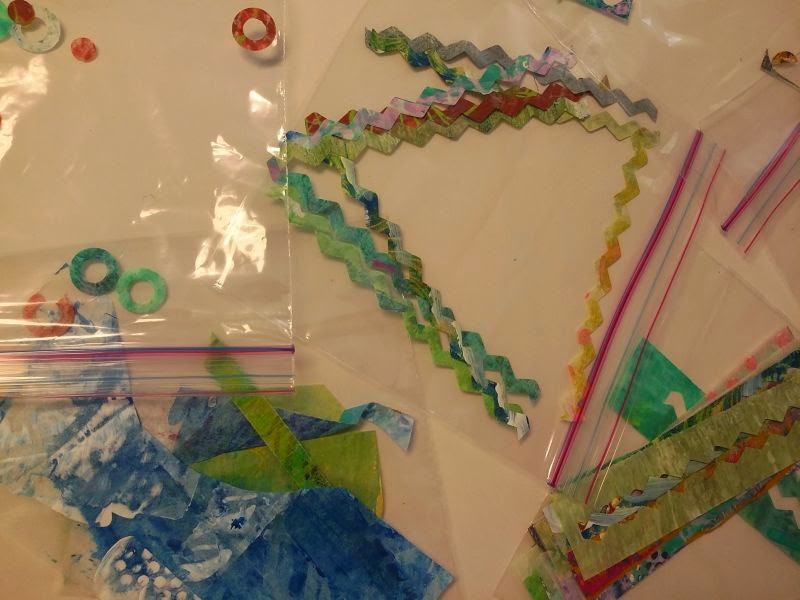
5.  Using scraps from edges of deli paper, run through various dies on my Big Kick using Bigz dies mostly, getting the zigzag cuts, flowers, etc.  See these in my plastic baggies here:
6.  Now the challenging part, using the bits to create a card.  I prefer a clean and simple style, although I will probably not always achieve it.  In addition to the two made and shown in my previous blog entry, I now have two more, at this rate, I will still be at it until Christmas!  Here are more pics of the  two new ones:


7.  Need to run the sentiments through the Xyron sticker machine so that customers (or I) will be able to choose which one I want to use.  

8.  Address labels are also made and included (Note each sentiment is edged with markers to coordinate with the card, and the address label also embellished with marker. 

All this for $5.00 each?  I plan to give all proceeds to my local charitable foundation.  Maybe I will get faster at accomplishing all these tasks, but I keep getting new ideas.  Believe it or not, the tiny bits I have snipped off the corners of the envelopes are also going to be used.  More on that later in later posts when I actually use them.  

Wednesday, July 16, 2014

What to do with all that beautiful painted deli wrap paper?

Oh my goodness, I can't stop myself.  I am absolutely bonkers over how beautiful the papers are after scraping paint, or using Gelli Plate printing and I just wanted to use the paper in a way that would really highlight the artistic beauty, but still be useful.  I have loads of the paper and, of course came up with an idea to use as many of my toys as possible.

Envelope Punch Board
Cameo Digital Cutting Machine
Xyron Sticker Machine--2.5" wide
Lots of deli wrap paper
Simple white card stock
Glue (I used Golden's matte medium)
Markers, Several different ones, also used Inktense Blocks and Pencils
My Silkscreens where needed to add punch to design

Of course you can come up with other ways of accomplishing same thing.
This is the first card and envelope I made:


I was inspired by this photo of card I saw somewhere, wish I knew where:


But first I started with making envelopes from the deli wrap and giving my envelope punchboard a workout.
Here are some ---I don't know how many would start a project with an envelope and work backward, but I just had fun with the Envelope punch Board and the deli papers---

and these:


 These envelopes have such a luxurious feel, reminds me of the old airmail envelopes, only prettier/better.  Then I thought of the card I had seen above and decided this would make a lovely coordinating card.  So here is the first one I made.  The cloud was cut from my Cameo, but any type sentiment/tag shape would do fine:


The cloud was just sitting on top there, I later ran it through Xyron and stuck it down.
My next iteration was to see if I could put my name on the back of the card "handcrafted by"  and also create stickers so that the card could be used for three separate purposes based on what was needed--i.e., Thank You, Happy Birthday, or Get Well Soon.  Here is the screenshot of my layout on my Cameo, used print and cut but "without" the registration marks since the text I wanted would easily fit the shapes and with careful alignment of the printed cardstock on the mat.
Here is what came out of the printer and what I then cut as shown above on my Cameo (yes, I had forgotten to turn on the "thank you" to print so I have a gap there, but you get the idea:


 So I created this card with three separate sentiments on sticker paper using my home printer (some I tried using pen in Cameo, but home printer was easier).  Then I ran the clouds through Xyron Machine.  --Here is the second card with a sticker for mailing label and three sentiment stickers.


My deli papers had pretty much lots of paint coverage, and I realized that the half of the "leaf" motif looked best if it had complimentary or matching colors but more white space and maybe bolder patterns, but to be honest, I think any combination with this design looks pretty good.  I created some papers using markers, paint, etc on more deli wrap to have a range of choices.  Here are some of the papers in my stash.  You can tell which ones are total coverage (scraped paint and layers) vs bold hand painted doodling designs.


Now I need to get busy making some more, I have all the parts and pieces, BUT, the painting of the papers gets to be such fun, I always want to head over there.  I did make myself a quick template of cardstock with the pointed oval shape so I can preview paper combinations before I decide to cut/use.


Because of the size of the deli wrap paper, after cutting out the square I needed for envelope, I had edge pieces left with which to make the motif designs on the card like these


Wednesday, July 09, 2014

Very Inexpensive multimedia background papers

In my continuous play and experiments, esp with background papers, art journaling techniques and finding new uses for silkscreens, stencils, etc I have made a neat discovery.
I bought a package of full page shipping labels very cheaply from Amazon $12.97 for 100.  I thought it would be great to paint and then peel off back and already have adhesive on the paper.  Some I did just this way, then I could cut into shapes, or whatever to use as needed.  Also could gelli plate print them.  Then, purely by accident, I painted the wrong side, that is the part that peels away with no adhesive on it.


I  had fun using credit card to spread paint, underneath was a texture sheet which leaves nice texture as I go.  Also, very economical since only a thin layer of paint is used when spreading with credit card.  I liked it , especially the nice satiny finish of the paper until I realized it was the peel away part (maybe plasticized? somewhat?)  It had a nice feel when the paint was on it.  Then I thought, these labels are printable with either ink jet or laser, but perhaps not the wrong side?  what if I printed something on it, would inkjet ink stick?  I have an Epson WP4530 inkjet printer, so I set it up for thick paper and used the back loading tray and printed these gals on it.
Then I thought what if I painted the other (right) side, would I mess up this side in anyway, i.e., bleeding through, etc.  I knew the other side was the one that would have a full coverage of adhesive, but this one would not, and to use I would have to add adhesive.  So I painted away, even using some embossed cardstock underneath to create some texture and here is the resulting other side with silver paint scraped onto plastic stencil as well.
Next shows when I fold over, the other paper o the other side with no bleeding through, although I did get a little on the edge as I scraped and moved page onto some paint, nothing major though