Here is a video showing that process:

Showing posts with label inktense blocks. Show all posts
Showing posts with label inktense blocks. Show all posts
Tuesday, April 10, 2018
Circling back to older hobby Polymer Clay
It has been a very long time since posting, I have gone back to an old hobby of mine and have learned new tricks. One thing I have been able to do is crossover many of my skills/techniques to almost all of the hobbies. Making Polymer Clay jewelry has been more fun for me this time around. I am also finding new ways to apply my old skills to Polymer Clay. Most recently, similar to making labels on my Silhouette Studio Cameo by sketching outlines in black, then painting them in as I need them, as I did here, and here. So now I am using similar approach with my polymer clay, silkscreen designs on raw clay, let dry, then apply color as needed using alcohol inks and Inktense blocks:
Here is a video showing that process:
Here is a video showing that process:

Wednesday, July 16, 2014
What to do with all that beautiful painted deli wrap paper?
Oh my goodness, I can't stop myself. I am absolutely bonkers over how beautiful the papers are after scraping paint, or using Gelli Plate printing and I just wanted to use the paper in a way that would really highlight the artistic beauty, but still be useful. I have loads of the paper and, of course came up with an idea to use as many of my toys as possible.
Envelope Punch Board
Cameo Digital Cutting Machine
Xyron Sticker Machine--2.5" wide
Lots of deli wrap paper
Simple white card stock
Glue (I used Golden's matte medium)
Markers, Several different ones, also used Inktense Blocks and Pencils
My Silkscreens where needed to add punch to design
Of course you can come up with other ways of accomplishing same thing.
This is the first card and envelope I made:

I was inspired by this photo of card I saw somewhere, wish I knew where:

But first I started with making envelopes from the deli wrap and giving my envelope punchboard a workout.
Here are some ---I don't know how many would start a project with an envelope and work backward, but I just had fun with the Envelope punch Board and the deli papers---

and these:


These envelopes have such a luxurious feel, reminds me of the old airmail envelopes, only prettier/better. Then I thought of the card I had seen above and decided this would make a lovely coordinating card. So here is the first one I made. The cloud was cut from my Cameo, but any type sentiment/tag shape would do fine:

The cloud was just sitting on top there, I later ran it through Xyron and stuck it down.
My next iteration was to see if I could put my name on the back of the card "handcrafted by" and also create stickers so that the card could be used for three separate purposes based on what was needed--i.e., Thank You, Happy Birthday, or Get Well Soon. Here is the screenshot of my layout on my Cameo, used print and cut but "without" the registration marks since the text I wanted would easily fit the shapes and with careful alignment of the printed cardstock on the mat.


So I created this card with three separate sentiments on sticker paper using my home printer (some I tried using pen in Cameo, but home printer was easier). Then I ran the clouds through Xyron Machine. --Here is the second card with a sticker for mailing label and three sentiment stickers.


My deli papers had pretty much lots of paint coverage, and I realized that the half of the "leaf" motif looked best if it had complimentary or matching colors but more white space and maybe bolder patterns, but to be honest, I think any combination with this design looks pretty good. I created some papers using markers, paint, etc on more deli wrap to have a range of choices. Here are some of the papers in my stash. You can tell which ones are total coverage (scraped paint and layers) vs bold hand painted doodling designs.


Now I need to get busy making some more, I have all the parts and pieces, BUT, the painting of the papers gets to be such fun, I always want to head over there. I did make myself a quick template of cardstock with the pointed oval shape so I can preview paper combinations before I decide to cut/use.


Because of the size of the deli wrap paper, after cutting out the square I needed for envelope, I had edge pieces left with which to make the motif designs on the card like these

Envelope Punch Board
Cameo Digital Cutting Machine
Xyron Sticker Machine--2.5" wide
Lots of deli wrap paper
Simple white card stock
Glue (I used Golden's matte medium)
Markers, Several different ones, also used Inktense Blocks and Pencils
My Silkscreens where needed to add punch to design
Of course you can come up with other ways of accomplishing same thing.
This is the first card and envelope I made:
I was inspired by this photo of card I saw somewhere, wish I knew where:
But first I started with making envelopes from the deli wrap and giving my envelope punchboard a workout.
Here are some ---I don't know how many would start a project with an envelope and work backward, but I just had fun with the Envelope punch Board and the deli papers---
and these:
These envelopes have such a luxurious feel, reminds me of the old airmail envelopes, only prettier/better. Then I thought of the card I had seen above and decided this would make a lovely coordinating card. So here is the first one I made. The cloud was cut from my Cameo, but any type sentiment/tag shape would do fine:
The cloud was just sitting on top there, I later ran it through Xyron and stuck it down.
My next iteration was to see if I could put my name on the back of the card "handcrafted by" and also create stickers so that the card could be used for three separate purposes based on what was needed--i.e., Thank You, Happy Birthday, or Get Well Soon. Here is the screenshot of my layout on my Cameo, used print and cut but "without" the registration marks since the text I wanted would easily fit the shapes and with careful alignment of the printed cardstock on the mat.
Here is what came out of the printer and what I then cut as shown above on my Cameo (yes, I had forgotten to turn on the "thank you" to print so I have a gap there, but you get the idea:
So I created this card with three separate sentiments on sticker paper using my home printer (some I tried using pen in Cameo, but home printer was easier). Then I ran the clouds through Xyron Machine. --Here is the second card with a sticker for mailing label and three sentiment stickers.
My deli papers had pretty much lots of paint coverage, and I realized that the half of the "leaf" motif looked best if it had complimentary or matching colors but more white space and maybe bolder patterns, but to be honest, I think any combination with this design looks pretty good. I created some papers using markers, paint, etc on more deli wrap to have a range of choices. Here are some of the papers in my stash. You can tell which ones are total coverage (scraped paint and layers) vs bold hand painted doodling designs.
Now I need to get busy making some more, I have all the parts and pieces, BUT, the painting of the papers gets to be such fun, I always want to head over there. I did make myself a quick template of cardstock with the pointed oval shape so I can preview paper combinations before I decide to cut/use.
Because of the size of the deli wrap paper, after cutting out the square I needed for envelope, I had edge pieces left with which to make the motif designs on the card like these
Wednesday, May 28, 2014
Experimenting and playing
One of my recent favorite coloring medium is (are?) the Derwent Inktense Blocks. I have a set of 24 bought at Amazon and love them. They are intense colors if you want them to be but light watercolor looking if you want that also. Most importantly, when dry, they are permanent and you can use on fabric, paper, etc.

I have been using some things made with my Cameo (mostly stencils, but I thought, hmmm, wonder how some of my early foam cuts would work used as stamps. Remember one of my earliest foam cuts of girl swinging on tree?
 I turned her over, spritzed backside with water from a fine mist spray bottle then swiped the blocks over different parts to color them, yellow for hair, blue for dress, some neutral skin tones and browns and green for leaves, etc, --here is a picture of the smeary mess--


 Did the same thing as above
 and stamped this


I have been using some things made with my Cameo (mostly stencils, but I thought, hmmm, wonder how some of my early foam cuts would work used as stamps. Remember one of my earliest foam cuts of girl swinging on tree?
I turned her over, spritzed backside with water from a fine mist spray bottle then swiped the blocks over different parts to color them, yellow for hair, blue for dress, some neutral skin tones and browns and green for leaves, etc, --here is a picture of the smeary mess--
then turned her over (just used my fingers with a paper towel to press down onto paper, and here is what I got:
here is a picture after stamping showing the blocks I used.
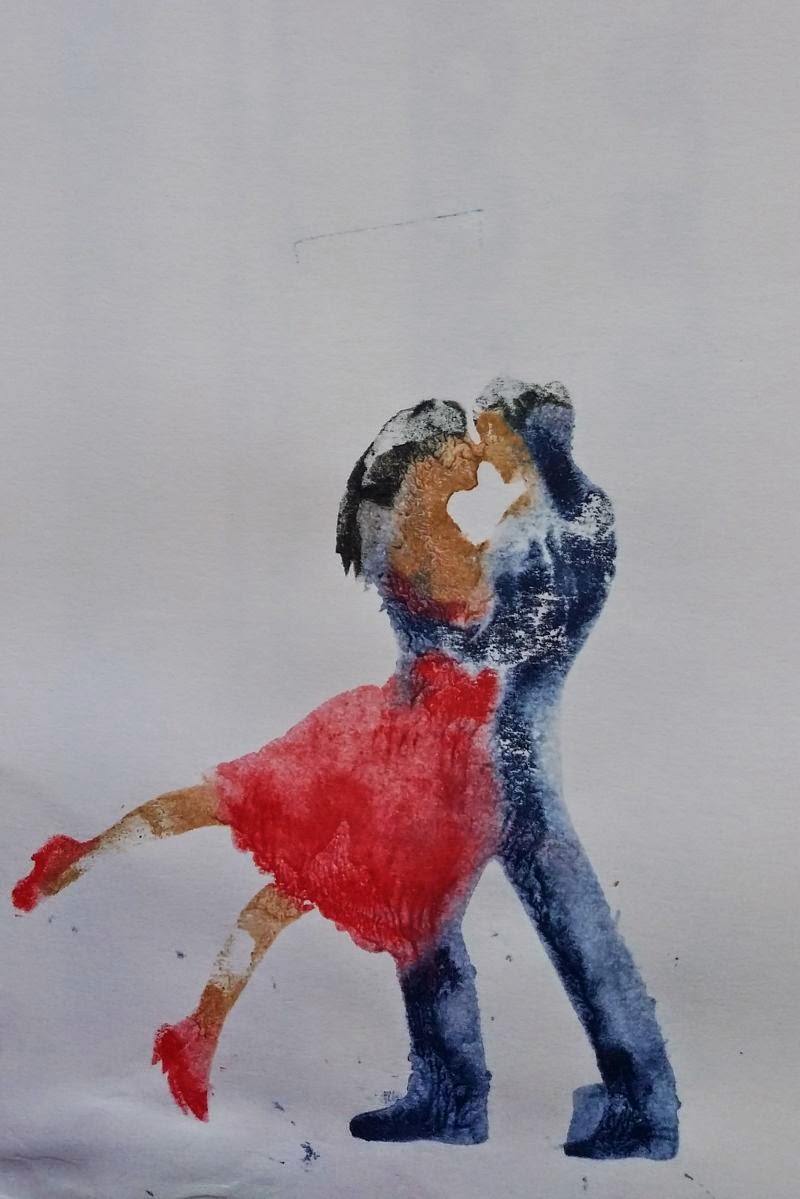
Then I took the dancers from another early experiment in cutting foam on the Cameo
Did the same thing as aboveand stamped this
I love the painterly, watercolorey look of these. I also sprayed cosmetic sponge onto stencils I made with the Cameo and created these pages in my sample book.
another foam geometric stamped on page using inktense as well:
and here are shots of samples using stencils cut with Cameo and inktense blocks
Subscribe to:
Posts (Atom)